
Cracking Vertical Anamorphic Monitoring with the Sony FX6— A Framework for the Future
If you’re like me, you’ve heard a lot of talk about the film industry slowing down. We’re living through a shift in how audiences consume media — and that shift inevitably changes how we create it. For many DPs and camera nerds, adapting is the job description — squeezing every ounce of creativity out of whatever we’ve got.
Today, I’m sharing a neat “hack” I discovered while testing the new Blazar Beetle 1.33× anamorphic lenses. They’re compact and render a lovely image, but the slick party trick here is that you can rotate the front anamorphic block 90° while mounted.
Now, I’ve always loved anamorphic glass — not just for the wide canvas or the history of “Cinemascope”, but for its psychological texture: that subtle optical distortion that whispers cinema. But when so much content is viewed vertically on phones, that 2.39:1 frame can feel like a beautiful painting trapped in a postage stamp. I’m not here to sell lenses or make an argument that vertical video is better — just to share a workflow that might help a few of us stay nimble as storytelling formats evolve.
Let's talk (cinema)scope:
"Please keep framing in mind... we will also need 9x16 vertical and other versions for social media”

The Problem: Vertical + Anamorphic = Headache
I’ve worked on commercials where we literally scheduled camera flips just to shoot both vertical and horizontal takes of the same setup — a logistical and creative headache. When I got hold of the Blazar Beetle set, I wanted to test them on my Sony FX6 in vertical orientation with one goal: frame properly for multiple aspect-ratios straight out of the camera, without extra gear or post-workflow sacrifices. I was looking for a method that maximised every available pixel while preserving composition, regardless of the delivery format.
My Setup
-
Blazar Beetle 1.33× anamorphic lens — rotated 90°, compressing light top-to-bottom instead of side-to-side
-
Sony FX6 camera — rotated 90° for vertical shooting
-
SmallHD 5″ monitor
On the SmallHD, I set:
Aspect / Input Video → 4:3
That setting “de-squeezes” the image — though in this configuration, it’s technically re-squeezing the 16:9 feed into a 4:3 interpretation.
When the camera and monitor are physically mounted vertically, you end up with a 3:4 vertical live feed that looks correct. Perfect for vertical anamorphic.


"But what if I want to crop to actual 4:3?"
From here, the built-in aspect ratio guides aren't accurate for your monitoring needs. Not only are you now looking at a 90 degree image, but a vertical 1:1 guide on your monitor is no longer a 1:1 in your footage thanks to the anamorphic distortion.

The Math
Here’s how the math breaks down when you rotate a 1.33× lens 90° vertically:
-
A desqueezed 4:3 4K frame equals 2880×2160 (1440×1080 in HD)
-
When rotated vertical → 2160×2880 (1080×1440 in HD) = a 3:4 vertical
-
To crop a 3:4 image inside that frame → 2160×1624 (4K) or 1080×812 (HD) = 1.33:1
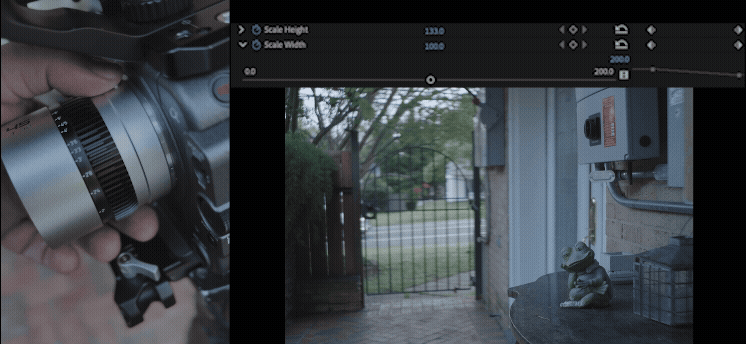
If you want to overlay a 4:3 guide, because the image is already squeezed 75%, your crop needs to multiply by another 0.75: ----- 0.75 × 0.75 = 0.5625 → 56.25%
So, on the SmallHD “Aspect” tool, I set:
-
Width: 56%
-
Height: 100%
Ironically, a 16x9 final crop can be preempted with native 3:4 guides.
…and when I tested in Premiere — it lined up exactly.

Why It Matters
This workflow gives you accurate vertical anamorphic framing — no guesswork, no post-production surprises.
It’s a small tweak, but it opens creative precision for anyone exploring vertical anamorphic content.
Even if you’re not using a SmallHD, the math still applies. The FX6’s built-in markers also line up nicely once you understand the relationship between the different aspects and how they are affected by the anamorphic distortion. Let's say you're unable to interpret the signal as 4:3 on your external monitor.
On the FX6, if you set your aspect to 1:1, it equals 4x3 in post. If you want vertical 9x16, set your guides to 2.35:1. If you want a 16x9, create a custom guide to 03.00:4.00.


About Accuracy (and Pixels)
When starting your preliminary edit, you can load your footage into a timeline in this two ways:
-Pixel-Exact Master (203:270)
or
-Aspect-Conform Master (3:4 true)
For example a 3:4 (1624×2160) timeline keeps every pixel but yields a 203:270 ratio. Where as a TRUE 3:4 timeline of (1620×2160) shaves pixel lines to honor that square format exactly.
You'll need to do your own math when it comes to the project or client needs, technically speaking, both will work; it depends on whether your delivery values pixel purity or canvas purity. Personally, I like having both versions on the drive.


In a way, this little math puzzle reminded me why I fell in love with cameras in the first place. Every new format, every so-called “problem,” is really just an invitation to play again — to see light, physics, and storytelling as the same conversation. Vertical, horizontal, anamorphic or not — what matters is that we keep innovating and looking for new ways to fill the frame with meaning.
If this helps you, drop me a note or tag me when you try it. I’d love to see how others push this idea further.